Getting walls to work the way you want them to is one of the trickier aspects of dream weaving. One of the common mistakes furres make when creating dreams is based around using walls. This tutorial is here to introduce you to a few of the walls and the different properties that these special walls hold.
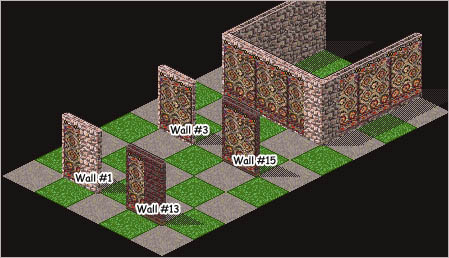
Here is the picture of the dream that we will be referring to for this Tutorial. This dream can be downloaded at the bottom of this page.
The picture has a couple of things that we will be talking about in this tutorial. You'll notice that we have four single walls, two of each color, that have a tapestry hanging from them. The way the tapestry looks, however, is not the same for all four walls, nor is it the same for the same colored walls. You'll also notice that we have one large wall that has rows of tapestries hanging from them. Two of the tapestries are only half shown. We will address both of these issues. Let's go ahead and talk about what is going on with these walls and objects.
Starting with the four walls with tapestries, we notice a few things. Both the light walls and the dark walls have one full tapestry and one half of a tapestry. This is because we actually have four different wall objects placed here. It may not look like it, but the two dark walls and the two light walls are actually different wall numbers.
The two light walls are wall #1 and wall #3. the two dark walls are wall #13 and wall #15. You might be wondering why we'd have two different versions of what seems to be the same type of wall. Here's why:
Wall #1: This wall is light in color. You cannot walk through this wall, and sometimes only part of the object that is placed in front of it will show up.
Wall #3: This wall is light in color. You can walk through this wall, and the entire object will always show up when placed in front of this wall.
Wall #13: This wall is dark in color. You cannot walk through this wall, and sometimes only part of the object that is placed in front of it will show up.
Wall #15: This wall is dark in color. you can walk through this wall, and the entire object will always show up when placed in front of this wall.
From this information, we can make a guess at which walls are which. The two pieces of wall that have only half of the tapestry showing are walls #1 and #13. You cannot walk through either of these walls. The two pieces of wall that show the entire tapestry are walls #3 and #15. You can walk through these walls.
But as stated earlier, walls #1 and #13 won't always cover up part of the object that is in front of it. Take a look at the large, square wall in the picture. This wall is made entirely out of wall #1, but only in two spots are pieces of the tapestry missing. Why is this? Parts of the object in front of the wall are only cut off if the wall that the object is placed in front of is the southernmost part of the wall. You can see that this is true from the picture. The two tapestries that have missing parts are placed on either the furthest SE wall, or the furthest SW wall.
You are probably asking yourself why you'd ever want to use wall #1 and #13 when you could just use wall #3 or #15 instead. Well, you can't forget one important thing: walls #3 and #15 can be walked through. So sure, you'll never have to worry about parts of your objects disappearing, but people will be able to walk through your walls as if they weren't even there. So a successful dream weaver needs to know when to use the walkable walls and when to not use them.
I highly suggest downloading the example dream, or creating one of your own. The best way to understand how these walls work is to test it out yourself. Simply knowing that there are two different versions of the light and dark walls is all you really need to know. With that knowledge, you can play around and see exactly how the walls work; find out when pieces of objects will not show up, and find ways of fixing it. Just remember that walls #3 and #15 can be walked through.
Another common problem that furres have when using walls is when they try to use walls in combination with object 177. We have a different tutorial you can read for further information on this subject. If you're interested, click . If you have any further questions/problems with walls, you can download a copy of this dream from the link below. if that doesn't help, you can always e-mail us at the e-mail address at the bottom of the page. Good luck!
Do you have a question that you couldn't find the answer to? Is there a tutorial that you'd like to see added to the MKb? If so, drop us an e-mail. The MKb is created for the Furcadian public, so in order to be effective, we need to know what information you want it to contain. If e-mail links don't work for you, just send us an e-mail at masons@furcadia.com. We look forward to hearing from you.