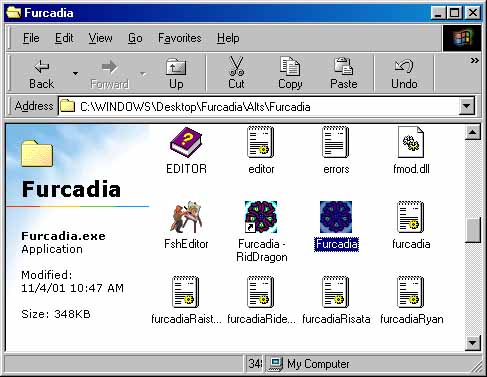
Making a New CharacterBelow is information on how to create a brand new character, how to create multiple characters, using different characters (alting), and how .ini files work. So, you've just downloaded and installed Furcadia. The first thing you're probably going to want to do is create a character. This is a very simple process. Furcadia actually walks you through it. Now, let's begin. You start by double-clicking on the Furcadia.exe program. This is the actual program you'll use to play Furcadia. When you do this, the Furcadia.exe program looks for a furcadia.ini file in your Furcadia folder. I'll explain in detail what .ini files are a little later on this page, but just so you know, the furcadia.ini file stores the information about your furre that connects to Furcadia. Since you haven't run Furcadia before right now, you do not have a furcadia.ini file, so the Furcadia client is going to help you create one.
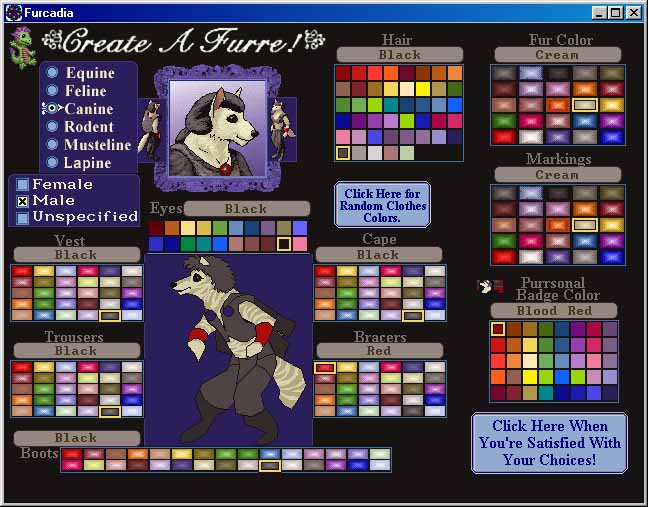
Double-clicking on the Furcadia.exe program without having a furcadia.ini file in your Furcadia folder will bring you to the character creation screens. The first thing you're able to do is choose what your furre looks like. You choose their gender, species, markings and colors. There are pictures that help show what you will look like, so you can make sure you have the color scheme you wish. Once satisfied, click on the button in the lower right to proceed to the next step.
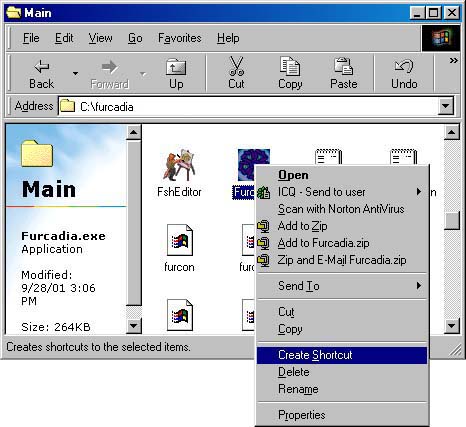
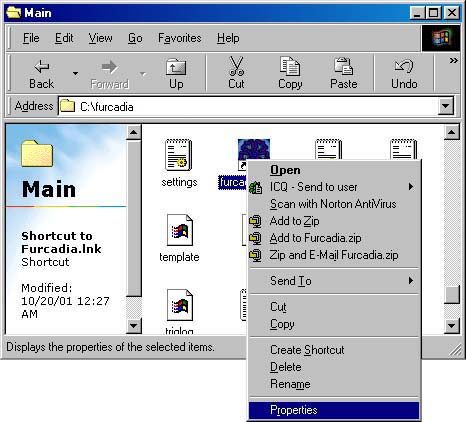
You now get to put in your description. Don't worry about getting in perfect. You can always change what you look like and what your description says later by using the Furcadia Character Editor (FurEd.exe). Type up whatever you like for your description and move onto the next step. You now need to put in a valid e-mail address. Although not required, it is very wise of you to put in your actual e-mail address, and to make sure that it's an e-mail address you'll be keeping for awhile. Furcadia does not frequently send out mass e-mails to all of its users. Because of this, you don't need to worry about spam e-mails. Furcadia also keeps your e-mail address confidential, and will not share your information with other parties. The important reason to have a valid e-mail address is to aid you should you have any problems with your character and need to e-mail the Furcadian staff for help. Some problems can't be helped unless we know you're the true owner of the furre name, and sending an e-mail from the e-mail address you specified here will help to verify that you are the actual owner of the furre. Type in your e-mail address and proceed. Now it's time for a password. These are very important. You want to pick something you can remember, but you also want to make sure that it's unique enough that no one would guess it. Combinations of letters and numbers is usually your best bet. Be sure to write down your password, even if it is something easy to remember. You never know when you'll have a spell of forgetfulness. When done, go on to the last step. Now it's time for your furre name. This is sometimes a tricky part, not necessarily because choosing a name can be tricky, although it can be, but more so because people aren't quite sure at first how their furre's information is actually stored. Once you have chosen a name, you cannot change the capitalization of it. This is important to point out, because many furres name themselves something like "ridere", and then realize that they wanted to have the first letter capitalized but now can't do anything about it. Also, if you choose a name that's already taken, Furcadia will tell you so, and you'll need to choose a new name. Spaces are allowed, but they're handled in a way that may be difficult to understand at first. Dealing with spaces will be talked about in another part of this guide. Hit the Enter key, when you're ready to move on. Now that you have created a character, a furcadia.ini file has been saved into your Furcadia folder, so that you don't need to create a new character every time you log onto Furcadia through the Furcadia.exe program. All of your character's information has been stored in this furcadia.ini file. If this is your first time in Furcadia, you should now actually be able to walk around and talk to furres. Because this part of the guide is not to teach you about how to use the actual Furcadia client, I'm going to stop here and go on to describe how to create multiple characters and explain how .ini files are used. Let's say you already have one furre, but you want to create another. You may want to create another to use only for roleplaying, or you may simply just not like the name you chose. Below are the steps you need to take in order to create more than one furre. As stated in the first part of this guide, your furre's information is stored in a file that's called furcadia.ini. As long as there is a furcadia.ini file in your Furcadia folder, you will not be able to create a new character. This is simple enough to fix, however. You can either rename the furcadia.ini file (which I suggest), or you can delete the furcadia.ini file. Say I had the information for Ridere saved in my furcadia.ini file, but I wanted to create a new character named Ryan. What I would do is rename my furcadia.ini file to furcadiaRidere.ini. In doing this, I have now removed the furcadia.ini file from my Furcadia folder, but I have kept the information for Ridere in a renamed .ini file. Now that I have done that, I can create a new character, using the steps listed above. I should now have two character .ini files. One is named furcadia.ini, and it has the information for the new furre I just created (Ryan). The other is named furcadiaRidere.ini, and it has the information for my old furre (Ridere). So now whenever I run the Furcadia client, Ryan connects to Furcadia instead of Ridere, since Ryan's information is stored in the furcadia.ini file. The Furcadia client only reads the file named furcadia.ini and disregards all of the other renamed .ini files you may have in your Furcadia folder. Want to create another character? Sure, you can create however many you like! Just be sure to rename the current furcadia.ini file to something else (furcadiaRyan.ini, etc.) and then follow the steps to creating a new character listed in the first part of this page. For each furre you have, you have a different .ini file that stores the information for that furre. Remember this, and you'll be fine. Now... You're probably asking yourself how you can switch between furres. This process is known as Alting. Alt stands for Alternate Character, and when you alt, you are using more than one furre name. Many of you can probably venture to guess, but there are actually a few ways to do it. The most common is to just rename your .ini files again. Say my furcadia.ini file is still storing information for Ryan, but I want to connect Ridere to Furcadia today. What I would do is take my furcadia.ini file and rename it to furcadiaRyan.ini. I would then take my furcadiaRidere.ini file and rename it to furcadia.ini. Now when I run the Furcadia client, Ridere should be the one who logs onto Furcadia. A less common, but more efficient, way of alting is to make a shortcut to the Furcadia.exe file. Right-clicking on the Furcadia.exe file will give you a list of options. You want to choose the Create Shortcut option.
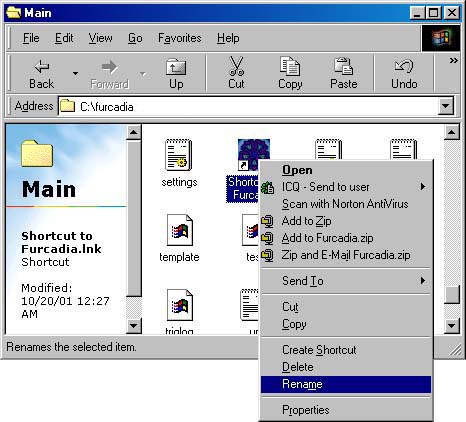
This should create a shortcut to Furcadia.exe inside your Furcadia folder. I would start off by renaming it from "Shortcut to Furcadia" to "FurcadiaRidere" using the name of the furre that you want to connect.
Now, right-click on the shortcut. Again, you'll see a list of options. This time, however, you want to choose the Properties choice at the very bottom.
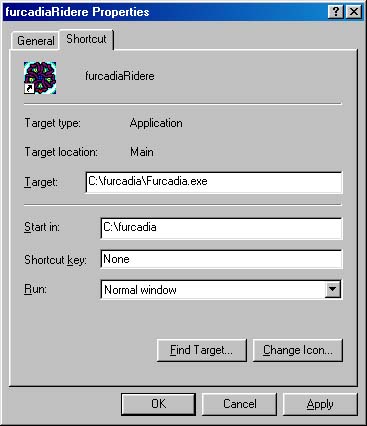
A Properties dialog box should now appear.
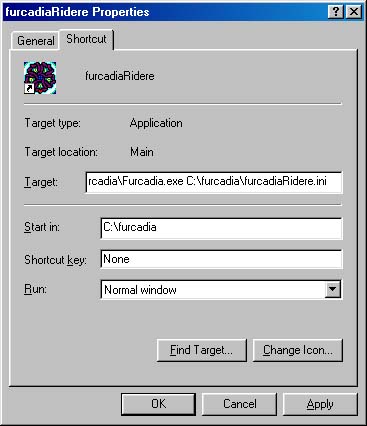
The Target box is the box you're going to deal with. Take all of the information in the Target box (highlight it all) and make a copy of it (Ctrl + C). Now scroll all the way to the right, until you see the end of the Target address (it should say Furcadia.exe at the end), and press the Spacebar once. You should now have one space after the Target Address. You now want to paste that copy of the address (Ctrl + V). If you look at the entire Target box now, you should see two copies of the same address, separated by a single space. Change the Furcadia.exe part of the second address to be the name of the .ini file you want to use (in my case furcadiaRidere.ini). Press the Apply button at the bottom and then press the OK button. The dialog box will disappear, and the changes should be saved.
Although I gave you pictures of the steps, let me give you text example, too, since I know the Target box isn't big enough to show it all: Start by right-clicking and choose Properties on the shortcut icon. Lets say the Target box shows C:\furcadia\Furcadia.exe. You want to copy the C:\furcadia\Furcadia.exe part by highlighting it all and holding down the Ctrl button while you press the C button. Now put a single space after the C:\furcadia\Furcadia.exe and hold down the Ctrl button while you press the V button. This will paste the copied text, so that you now have something that looks like this in the Target box C:\furcadia\Furcadia.exe C:\furcadia\Furcadia.exe now. Change the Furcadia.exe part of the second address to the name of the .ini file you want to connect with. Since I want to connect the character Ridere, whose information is stored in the furcadiaRidere.ini file, I would change it from Furcadia.exe to furcadiaRidere.ini. It should look something like this C:\furcadia\Furcadia.exe C:\furcadia\furcadiaRidere.ini now. Press the Apply and OK button, and you're done. What did this do exactly? Well, if you double-click on the Furcadia.exe file now, the character stored in your furcadia.ini file should connect, which hasn't changed any (Ryan in my case). But if you double-click on that shortcut you created, the character stored in the .ini file you specified should connect to Furcadia (Ridere in my case). What's better than that is that you can play both of your characters at the same time. All you have to do is double-click on the Furcadia.exe program and the shortcut that you made. I could log Ryan and Ridere onto Furcadia at the same time. Pretty cool, huh? Yes, you can do this with more than just two furres. Just follow the steps above to create a new shortcut. Each shortcut needs to be named differently, and each shortcut needs to have a different .ini file in it. And for the record, no, you can't log two Rideres or two Ryans onto Furcadia at the same time. If this didn't work for you, make sure that you did all the steps correctly. If it still doesn't work for you, then check to see if you have any spaces in the address. (C:\Program Files\furcadia\Furcadia.exe for example). The space between Program and Files may confuse your computer. Try putting the address in quotations:"C:\Program Files\furcadia\Furcadia.exe". It's probably easiest to just make sure you don't have any spaces in your address. Let me explain .ini files a bit for you now. INI files are files that store information for programs. Furcadia isn't the only program that uses .ini files, and your character information isn't the only information that Furcadia stores in .ini files. Your settings, for example, are also stored in an .ini file.
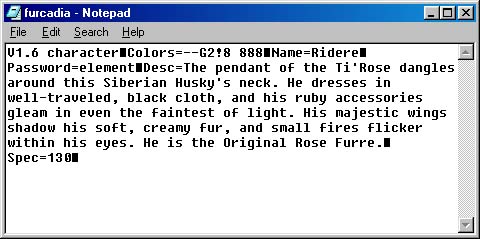
Here is an example of what a .ini file looks like: V1.6 character Colors=--G2!8 888 Name=Ridere Password=element Desc=The pendant of the Ti'Rose dangles around this Siberian Husky's neck. He dresses in well-traveled, black cloth, and his ruby accessories gleam in even the faintest of light. His majestic wings shadow his soft, creamy fur, and small fires flicker within his eyes. He is the Original Rose Furre. Spec=130
Let me break down each section for you. V1.6 character: This shows the version of the .ini. It is not something that you should worry about. Colors=: This is your color code. Ridere's color code is --G2!8 888, and the space between the 8's actually is part of the code. It's not just a blank space to separate the code. You can edit your colors using FurEd.exe, so don't bother memorizing anything about this. Name=: Easy enough. This is your furre's name. Password=: This is your furre's password. Desc=: This is your description. Spec=: This is your species code. It stores the information about your gender, species, and markings. You may or may not see black squares in your .ini file. Don't worry about these. They just stand for a Return (Enter) character. Do not delete them from your .ini file. This is just a bit of information to show you what is in your .ini file and how it's stored. You can probably survive on Furcadia without ever having to actually open up your .ini files, but I figured I'd tell you a bit about them, anyway. Hopefully this section was able to help answer some of your questions about how to create and manage characters. If you have any further questions about character creation or alting, please make sure that the information isn't found anywhere else in these guides and then feel free to contact the Beekin Helpers.
 Beekin's Help Desk
|