Add Magic To Your Dream
VisualDS.exe stands for Visual DragonSpeak. This is the program that you use to add scripting to
your dreams for Furcadia. The Visual DragonSpeak editor combines many useful aspects of coding into one very convenient program.
Before I can go into detail on how to use the editor, let me first explain what DragonSpeak is and how you use it in your dream. Doing it this way will make sure you actually understand the reason why you'd want to use this program to begin with.
First and foremost, as your maps are saved as .map files, your DragonSpeak files are saved as .ds files. Every dream/map is composed of two files - the .map file and the .ds file. Even if you create a brand new dream and never once use VisualDS, you'll still have two lines of code in your dream that "tell" a furre where to appear in your dream.
Now on to what DragonSpeak (DS) boils down to. Basically, DragonSpeak is just a series of Causes and Effects. A simple DragonSpeak script would look something like this:
"If this happens, then do this."
That's all that it really is. There are Conditions, Areas and Filters that can also be used to enhance your DragonSpeak. So, a more complex DragonSpeak script would look something like this:
"If this happens, and this Condition is true, then at this Area, and with these Filters, do this."
So, as you can see, there are five aspects to DragonSpeak. These aspects are Causes, Conditions, Areas, Filters and Effects. Let me explain each for you.
|
Causes: These are what trigger a block of code in your dream. Stepping on a certain spot in the map, picking up a pillow, pressing the F3 button while holding a blue key ("using" a blue key) are a few examples of Causes. You need a Cause in any block of DragonSpeak, and it should be the first line of code in that block. Here are all of the current Causes that exist in DragonSpeak:
|
(0:0) When everything is starting up,
(0:1) Whenever somebody moves,
(0:2) When somebody moves into floor type #,
(0:3) When somebody moves into object type #,
(0:7) When somebody moves into position (#,#),
(0:4) When a furre turns,
(0:5) When a furre turns right(clockwise),
(0:6) When a furre turns left(counterclockwise),
(0:7) When somebody moves into position (#,#),
(0:9) When a furre arrives in the dream,
(0:10) When a furre leaves the dream,
(0:11) When a furre stands up,
(0:12) When a furre sits down,
(0:13) When a furre lays down,
(0:16) When a furre uses any object,
(0:17) When somebody picks up object type #,
(0:18) When somebody drops object type #,
(0:19) When somebody uses object type #,
(0:20) When somebody rolls exactly # on # dice of # sides,
(0:21) When somebody rolls # or lower on # dice of # sides,
(0:22) When somebody rolls # or higher on # dice of # sides,
(0:23) When somebody rolls exactly # on some dice,
(0:24) When somebody rolls # or lower on some dice,
(0:25) When somebody rolls # or higher on some dice,
(0:30) When a furre says anything,
(0:31) When a furre says {...},
(0:32) When a furre says something with {...} in it,
(0:50) When countdown timer # goes off,
(0:60) When a furre moves northeast,
(0:61) When a furre moves southeast,
(0:62) When a furre moves southwest,
(0:63) When a furre moves northwest,
(0:100) When # seconds have passed, offset by #,
(0:101) When the time is #:# FST,
(0:200) Whenever a dragon breathes
(0:201) When a dragon breathes on floor type #,
(0:202) When a dragon breathes on object type #,
(0:203) When a dragon breathes on position (#,#),
(0:204) Whenever a phoenix flames,
(0:205) When a phoenix flames on floor type #,
(0:206) When a phoenix flames on object type #,
(0:207) When a phoenix flames at position (#,#),
(0:250) When a furre turns into a dragon,
(0:251) When a furre turns into a phoenix,
(0:252) When a furre turns into a griffon,
(0:253) When a furre turns into a eagle,
|
Conditions: These are what you use to control if/when you want a block of code to execute. Say you want to code to execute when you press the F3 button while holding a blue key, but you only want it to work if position (100,100) is also a pole that you can't walk through. Here are all of the current Conditions that exist in DragonSpeak:
|
(1:2) and they move into floor type #,
(1:3) and they move into object type #,
(1:4) and they bump into a furre,
(1:5) and they successfully moved,
(1:7) and they move into position (#,#),
(1:8) and they can see position (#,#),
(1:10) and the triggering furre is the dream owner,
(1:11) and the triggering furre has got shared control (or is the dream owner),
(1:12) and the triggering furre is facing towards position (#,#),
(1:13) and the triggering furre is facing northeast (up and right),
(1:14) and the triggering furre is facing southeast (down and right),
(1:15) and the triggering furre is facing southwest (down and left),
(1:16) and the triggering furre is facing northwest (up and left),
(1:17) and they (moved from/are standing at) floor type #,
(1:18) and they (moved from/are standing at) object type #,
(1:19) and they (moved from/are standing at) position (#,#),
(1:20) and the triggering furre is a rodent,
(1:21) and the triggering furre is an equine,
(1:22) and the triggering furre is a feline,
(1:23) and the triggering furre is a canine,
(1:24) and the triggering furre is a musteline,
(1:25) and the triggering furre is a lapine,
(1:26) and the triggering furre is a dragon,
(1:27) and the triggering furre is a phoenix,
(1:28) and the triggering furre is a griffon,
(1:30) and the floor at (#,#) is the same as the floor at (#,#),
(1:31) and the object at (#,#) is the same as the object at (#,#),
(1:40) and # step(s) northeast (up and right) from the triggering furre is floor #,
(1:41) and # step(s) southeast (down and right) from the triggering furre is floor #,
(1:42) and # step(s) southwest (down and left) from the triggering furre is floor #,
(1:43) and # step(s) northwest (up and left) from the triggering furre is floor #,
(1:44) and # step(s) NE & # step(s) NW from the triggering furre is floor #,
(1:45) and # step(s) NE & # step(s) SE from the triggering furre is floor #,
(1:46) and # step(s) SW & # step(s) SE from the triggering furre is floor #,
(1:47) and # step(s) SW & # step(s) NW from the triggering furre is floor #,
(1:50) and # step(s) northeast (up and right) from the triggering furre is object #,
(1:51) and # step(s) southeast (down and right) from the triggering furre is object #,
(1:52) and # step(s) southwest (down and left) from the triggering furre is object #,
(1:53) and # step(s) northwest (up and left) from the triggering furre is object #,
(1:54) and # step(s) NE & # step(s) NW from the triggering furre is object #,
(1:55) and # step(s) NE & # step(s) SE from the triggering furre is object #,
(1:56) and # step(s) SW & # step(s) SE from the triggering furre is object #,
(1:57) and # step(s) SW & # step(s) NW from the triggering furre is object #,
(1:70) and their name is {...},
(1:102) and they didn't move into floor type #,
(1:103) and they didn't move into object type #,
(1:104) and they didn't bump into a furre,
(1:105) and they were blocked from moving (or stood still),
(1:107) and they didn't move into position (#,#),
(1:110) and the triggering furre is not the dream owner,
(1:111) and the triggering furre hasn't got shared control (and is not the dream owner),
(1:112) and the triggering furre is not facing towards position (#,#),
(1:113) and the triggering furre is not facing northeast (up and right),
(1:114) and the triggering furre is not facing southeast (down and right),
(1:115) and the triggering furre is not facing southwest (down and left),
(1:116) and the triggering furre is not facing northwest (up and left),
(1:117) and they (didn't move from/aren't standing at) floor type #,
(1:118) and they (didn't move from/aren't standing at) object type #,
(1:119) and they (didn't move from/aren't standing at) position (#,#),
(1:120) and the triggering furre is not a rodent,
(1:121) and the triggering furre is not an equine,
(1:122) and the triggering furre is not a feline,
(1:123) and the triggering furre is not a canine,
(1:124) and the triggering furre is not a musteline,
(1:125) and the triggering furre is not a lapine,
(1:126) and the triggering furre is not a dragon,
(1:127) and the triggering furre is not a phoenix,
(1:128) and the triggering furre is not a griffon,
(1:130) and the floor at (#,#) is different than the floor at (#,#),
(1:131) and the object at (#,#) is different than the object at (#,#),
(1:140) and # step(s) northeast (up and right) from the triggering furre is not floor #,
(1:141) and # step(s) southeast (down and right) from the triggering furre is not floor #,
(1:142) and # step(s) southwest (down and left) from the triggering furre is not floor #,
(1:143) and # step(s) northwest (up and left) from the triggering furre is not floor #,
(1:144) and # step(s) NE & # step(s) NW from the triggering furre is not floor #,
(1:145) and # step(s) NE & # step(s) SE from the triggering furre is not floor #,
(1:146) and # step(s) SW & # step(s) SE from the triggering furre is not floor #,
(1:147) and # step(s) SW & # step(s) NW from the triggering furre is not floor #,
(1:150) and # step(s) northeast (up and right) from the triggering furre is not object #,
(1:151) and # step(s) southeast (down and right) from the triggering furre is not object #,
(1:152) and # step(s) southwest (down and left) from the triggering furre is not object #,
(1:153) and # step(s) northwest (up and left) from the triggering furre is not object #,
(1:154) and # step(s) NE & # step(s) NW from the triggering furre is not object #,
(1:155) and # step(s) NE & # step(s) SE from the triggering furre is not object #,
(1:156) and # step(s) SW & # step(s) SE from the triggering furre is not object #,
(1:157) and # step(s) SW & # step(s) NW from the triggering furre is not object #,
(1:170) and their name is not {...},
(1:200) and variable # is equal to #.
(1:201) and variable # is greater than #.
(1:202) and variable # is less than #.
(1:203) and variable # is equal to variable #.
(1:204) and variable # is greater than variable #.
(1:205) and variable # is less than variable #.
(1:206) and variable # is not equal to #.
(1:207) and variable # is not equal to variable #.
(1:208) and the X,Y position in variable # is the same as the position in variable #.
(1:209) and the X,Y position in variable # is not the same as the position in variable #.
(1:1000) and a random dice roll comes up (# percent of the time),
(1:1002) and they are holding item # in their paws,
(1:1004) and they're not holding item # in paws,
(1:1005) and they're standing,
(1:1006) and they're sitting,
(1:1007) and they're lying down,
(1:1008) and they're not standing,
(1:1009) and they're not sitting,
(1:1010) and they're not lying down,
(1:1100) and there's a furre at (#,#),
(1:1101) and there's no furre at (#,#),
(1:1011) and position (#,#) is floor type #,
(1:1012) and position (#,#) is not floor type #,
(1:1013) and position (#,#) is object type #,
(1:1014) and position (#,#) is not object type #,
|
Areas: These are what you use to control where the effect is going ot happen. Do you want it to happen everywhere on the map, only in a certain rectangle, only at a certain position? You use Areas to define this. Here are all the of the current Areas that exist in DragonSpeak:
|
(3:1) everywhere on the whole map,
(3:2) at position (#,#) on the map,
(3:3) within the diamond (#,#) - (#,#),
(3:4) within the rectangle (#,#) - (#,#),
(upper left - lower right)
(3:5) where the triggering furre (moved from/is standing at),
(3:6) where the triggering furre moved into,
(3:7) where the triggering furre is currently at,
(3:8) everyplace that the triggering furre can see,
(3:9) everyplace that can be seen from (#,#),
(3:50) # step(s) northeast (up and right) from where the triggering furre (moved from/is standing),
(3:51) # step(s) southeast (down and right) from where the triggering furre (moved from/is standing),
(3:52) # step(s) southwest (down and left) from where the triggering furre (moved from/is standing),
(3:53) # step(s) northwest (up and left) from where the triggering furre (moved from/is standing),
(3:54) # step(s) northeast (up and right) from where the triggering furre moved to,
(3:55) # step(s) southeast (down and right) from where the triggering furre moved to,
(3:56) # step(s) southwest (down and left) from where the triggering furre moved to,
(3:57) # step(s) northwest (up and left) from where the triggering furre moved to,
(3:60) # step(s) NE & # step(s) NW from where the triggering furre (moved from/is standing),
(3:61) # step(s) NE & # step(s) SE from where the triggering furre (moved from/is standing),
(3:62) # step(s) SW & # step(s) SE from where the triggering furre (moved from/is standing),
(3:63) # step(s) SW & # step(s) NW from where the triggering furre (moved from/is standing),
(3:64) # step(s) NE & # step(s) NW from where the triggering furre moved to,
(3:65) # step(s) NE & # step(s) SE from where the triggering furre moved to,
(3:66) # step(s) SW & # step(s) SE from where the triggering furre moved to,
(3:67) # step(s) SW & # step(s) NW from where the triggering furre moved to,
|
Filters: Filters are probably the most confusing of the five groups. They are used to filter down the Area of the Effect. They are sort of like Areas, but they are far more specific. Here are all of the current Filters that exist in DragonSpeak:
|
(4:0) clear all filtering,
(4:1) only where the floor is type #,
(4:2) only where the floor is not type #,
(4:3) only where an object type # is,
(4:4) only where there is no object type #,
(4:7) only where there is an object,
(4:8) only where there are no objects,
(4:9) only in places where someone can walk,
(4:10) only in places that can't be walked into,
|
Effects: Effects are what you see when you execute a block of code in your dream. Effects either change the map, play a sound file, move a furre, or set a timer to go off that will trigger another effect later on. Like Causes, each block of code needs to have at least one Effect in it. Unlike Causes, however, a block of code can have as many effects as you want. Here are all of the current Effects that exist in DragonSpeak:
|
(5:1) set the floor to type #.
(5:2) change floor type # to type #.
(5:3) swap floor types # and #.
(5:4) place object type #.
(use zero to clear out objects)
(5:5) change object type # to type #.
(5:6) swap object types # and #.
(5:8) play sound # to whoever set off the trigger.
(5:9) play sound # to any furre present.
(5:10) play sound # to every furre who can see (#,#).
(5:11) play sound # to every furre who can see the triggering furre.
(5:12) play sound # to everyone on the map.
(5:14) move the triggering furre to (#,#) if there's nobody already there.
(5:15) move the triggering furre to (#,#), or to someplace nearby if it's occupied.
(5:16) move any furre present to (#,#) if there's nobody already there.
(5:17) move any furre present to (#,#), or to someplace nearby if it's occupied.
(5:18) move the triggering furre back where they came from.
(5:21) move the object to (#,#).
(5:22) copy the object to (#,#).
(5:23) swap the object with the object at (#,#).
(5:24) copy the floor to (#,#).
(5:25) swap the floor with the floor at (#,#).
(5:26) add # to the object number.
(5:27) subtract # from the object number.
(5:28) add # to the floor number.
(5:29) subtract # from the floor number.
(5:30) play midi # to whoever set of the trigger.
(5:31) play midi # to everyone on the map.
(5:32) play music file # to any furre present.
(5:33) play music file # to every furre who can see (#,#)
(5:34) play music file # to every furre who can see the triggering furre.
(5:40) set the floor to type # at (#,#).
(5:41) place object type # at (#,#).
(5:50) set countdown timer # to go off in # seconds.
(5:78) eject the triggering furre.
(5:80) move any furre present # step(s) northeast (up and right) if there's nobody already there.
(5:81) move any furre present # step(s) southeast (down and right) if there's nobody already there.
(5:82) move any furre present # step(s) southwest (down and left) if there's nobody already there.
(5:83) move any furre present # step(s) northwest (up and left) if there's nobody already there.
(5:84) move any furre present # step(s) NE & # step(s) NW if there's nobody already there.
(5:85) move any furre present # step(s) NE & # step(s) SE if there's nobody already there.
(5:86) move any furre present # step(s) SW & # step(s) SE if there's nobody already there.
(5:87) move any furre present # step(s) SW & # step(s) NW if there's nobody already there.
(5:88) turn the triggering furre clockwise.
(5:89) turn the triggering furre counterclockwise.
(5:90) turn the triggering furre to face northeast.
(5:91) turn the triggering furre to face southeast.
(5:92) turn the triggering furre to face southwest.
(5:93) turn the triggering furre to face northwest.
(5:94) turn any furre present clockwise.
(5:95) turn any furre present counterclockwise.
(5:96) turn any furre present to face northeast.
(5:97) turn any furre present to face southeast.
(5:98) turn any furre present to face southwest.
(5:99) turn any furre present to face northwest.
(5:100) turn on "classic" mode and update the screen after each trigger.
(5:101) turn "classic" mode back off.
(5:102) share dream control with the triggering furre.
(5:103) share dream control with any furre present.
(5:104) activate text filter number #.
(use zero for no filtering, one for swear filter)
(5:105) set entry music to #.
(5:106) allow global dream uploads by dream owner only.
(5:107) allow global dream uploads by dream owner and shared furres.
(5:108) allow global dream uploads by everyone.
(5:109) allow dream pad uploads by dream owner only.
(5:110) allow dream pad uploads by dream owner and shared furres.
(5:111) allow dream pad uploads by everyone.
(5:112) make summoned furres arrive at the start of the dream.
(5:113) allow summoned furres to arrive right by the summoner.
(5:200) emit message {...} to whoever set off the trigger.
(5:201) emit message {...} to any furre present.
(5:202) emit message {...} to every furre who can see (#,#).
(5:203) emit message {...} to every furre who can see the triggering furre.
(5:204) emitloud message {...} to everyone on the map.
(5:210) set entrytext to {...}
(5:300) set variable # to the value #.
(5:301) copy the value of variable # into variable #.
(5:302) take variable # and add # to it.
(5:303) take variable # and add variable # to it.
(5:304) take variable # and subtract # from it.
(5:305) take variable # and subtract variable # from it.
(5:306) multiply variable # by #.
(5:307) multiply variable # by variable #.
(5:308) divide variable # by # and put the remainder in variable #.
(5:309) divide variable # by variable # and put the remainder in variable #.
(5:310) use variable # as an array, and copy element # of it into variable #.
(5:311) use variable # as an array, and set element # of it to #.
(5:312) set variable # to the total of rolling # dice with # sides plus #.
(5:313) set variable # to the total of rolling # dice with # sides minus #.
(5:314) set variable # to the number the triggering furre just said.
(5:350) set variable # to the X,Y position the triggering furre (moved from/is standing at).
Well, that's it for the five groups of DragonSpeak. Hopefully that gave you a better understanding on how to actually use it. The numbers in parenthesis and divided by a colon are the code numbers. You never want to change these. All # signs, however, need to be changed into a number of some sort. You need to change the single #'s into the number of either a floor tile or object number. The (#,#) pairs represent a position or coordinate. The first # stands for the X position, while the second # stands for the Y position. Remember the Information window in the Furcadia Dream Editor? Remember how it told you the current X and Y coordinates for where your cursor was pointing? This is where you need that information.
At the bottom of this page will be a link to another page that will be devoted solely to giving you DragonSpeak examples for some of the most asked/hard DragonSpeak codes. I also suggest you read all of dspeak1.txt, which is a Notepad file that is in your Furcadia folder. In fact, I suggest you read through it all at least twice, so that you can pick up on any additional information the second time around. It has a lot of useful information for you, including descriptions of most of the lines of DragonSpeak and what they do. Let's move onto the Visual DragonSpeak editor information now.
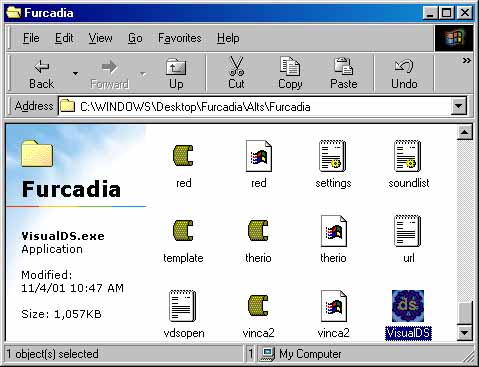
To open up the Visual DragonSpeak editor, you can either double-click on the VisualDS.exe file in your Furcadia folder (shown below), or you can use the DragonSpeak menu in your Furcadia Dream Editor. Chances are, you'll probably be using the DragonSpeak menu.
Once you have opened up the Visual DragonSpeak editor, you should see something that looks like this:
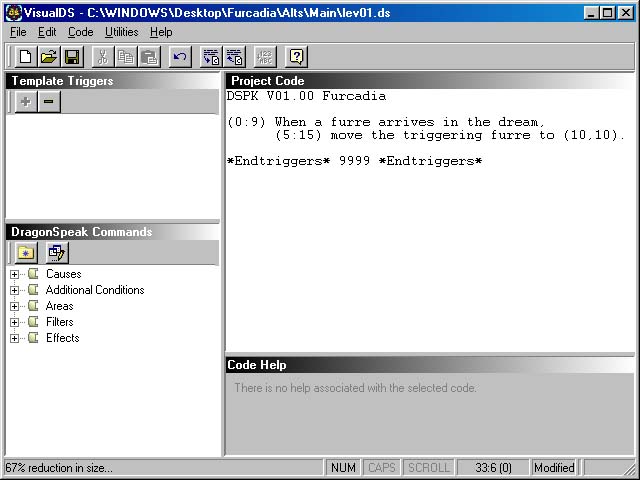
Like the other Furcadia programs, there are many different windows that offer you different types of information, so let me take this time to explain each one and what their purpose is for you.
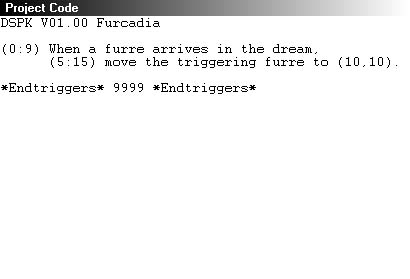
This is your Project Code window. This is where you want to actually put the lines of your DragonSpeak. All of your code should be between the two lines that show DSPK V01.00 Furcadia and *Endtriggers*
9999 *Endtriggers*. The two lines shown in this example are the two lines that you'll start with in all of your new maps. In case you're still unsure about DragonSpeak, what these two lines of code tell Furcadia is that whenever anyone
downloads your dream and appears, move them to position 10x10y in the dream.
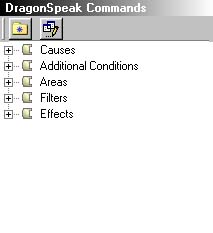
This is your DragonSpeak Commands window. Its purpose is to give you a list of all the lines of DragonSpeak code in all the five groups so that you don't have to bother memorizing them. It'll start off with all five groups collapsed. This means that when you click on the little + button by a group, it'll open that group. Here's a picture of the Area group opened:
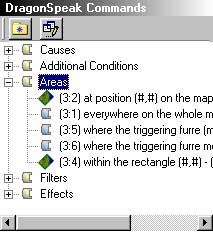
Pressing the - button will collapse that group once more, so that you can see the original five groups. You can keep all five groups opened, if you wish, but scrolling up and down to finda specific line of code may get a tad tedious if you do so.
Double-clicking on any line of code in this window will make a copy of it appear in your Project Code window at the current position of the blinking cursor in that window. This saves you time, so that you don't have to highlight the code, copy it, and then paste it into the Project Code window yourself.
Double-clicking on any line of code in this window while also having the Shift button pressed down will make a compressed copy of it appear in your Project Code window. Do this if you don't want all the extra words to appear with the DragonSpeak code line.
On top of the main window, there are also two buttons. The button with a blue star on a yellow folder will give you a list of all the recent lines of code that you have used. This is handy for when you want to use a specific line of code again, and don't want to collapse/open any of the groups on the bottom to get to it. The second button begins as being turned off. Pressing it will toggle it on and off. When this button is pressed down, and you double-click on a line of code, you'll get a compressed version of that line of code in the Project Code window. This means that all the extra words are left out of the DragonSpeak code and only the important numbers and # signs remain. I don't really recommend you use this. The deleted words don't really make your dream any smaller, and it may just only
confuse you if/when you need to go back to fix an error in your code. If you're wanting to condense your code like this, do so at the end, after you know everything works the way you want it to, using an option that I'll show you shortly.

This is your Code Help window. This handy window will give you information about your code. Use this by simply clicking anywhere on a certain line of your code. If there is nothing wrong with it, it'll give you the message shown in the picture. If there is something wrong with it, it'll tell you so.
NOTE: This bit of information I'm about to share is only useful for people who know how to make patches, so if you don't have any patches attached to your dream, you don't need to worry about the following information. If you use either a floore.fsh file or iteme.fsh file patch in your dream, and you use DragonSpeak with them, it'll tell you that 500 and 2400 are too large of numbers for your DragonSpeak code. Just ignore this warning. The Visual DragonSpeak editor doesn't really know about patches, and your DragonSpeak won't crash.
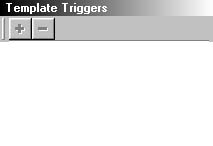
This is your Template Triggers window. You can save blocks of DragonSpeak here and use them whenever you open your Visual DragonSpeak editor. Certain pieces of code that you like to use in all of your dreams are handy to store here. To store a code, you simply highlight everything that you want to save in your Project Code window. The + button on the Template Triggers window should now be activated. Press it, and a New Snippet line will appear.
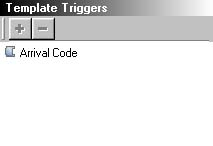
I suggest renaming it to something more meaningful that you can identify it by. Rename it by clicking on
it once, so it's highlighted, wait a second, and then click on it again. You should then be able to rename it. It's just like renaming a file in a folder. For my example, I highlighted the two lines of code that determine where a furre arrives in the dream, added that to the template, and then I renamed it to Arrival Code, as seen below. When you click on any of the list of templates that you've saved, the Code Help window will show you the block of code that is saved
in that saved "snippet".

These are your Menu and Tool Bars. Most programs have bars that look simular to this. I'll go ahead and explain the buttons first and then go on to the menus.
|

|
This is the New File button, and you can use this to make a brand new .ds file appear in your VisualDS.exe program.
|
|

|
This is the Open File button, and you can use this to open a .ds file that you have already saved.
|
|

|
This is the Save File button, and you can use this to save the current .ds file that you have opened in your VisualDS.exe.
|
|

|
This is the Cut button. When you highlight a group of text, you're able to use this button. Using the Cut button will make the group of highlighted text disappear and be saved in your clipboard. You can only save one group of text in your clipboard at a time.
|
|

|
This is your Copy button. When you highlight a group of text, you're able to use this button. Using the Copy button will make a copy of the highlighted text and save it in your clipboard. Remember, you can only save one group of text in your clipboard at a time.
|
|

|
This is your Paste button. When you use this button you will make whatever you have saved in your clipboard appear wherever your blinking cursor is in your Project Code window. So now you see that you can save a lot of time by using the Copy/Cut & Paste techniques in order to move text around and/or make copies of it.
|
|

|
This is your Undo button. If you make a mistake, you can press this button to revert back to how your .ds file was before you made that last change. It's handy if you accidentally delete some text, ect...
|
|

|
This is your Compress Selected Text button. You may not know that DragonSpeak doesn't care about all those words that are on each line of code. All DragonSpeak cares about are the numbers. If you highlight a group of code and use this button, all the extra words will be removed, so that you just have what's needed, the numbers. Dreams that had a lot of DragonSpeak used to take a long time to load. Removing the words helped reduce the size of the .ds file and make the dream load faster. This isn't the case anymore, so removing the words doesn't really offer any useful effects, but you still may wish to do this.
|
|

|
This is your Uncompress Selected Text button. This is the exact opposite of the previous button. If you highlight a group of text that only has the numbers and press this button, it'll put the words back in for you.
|
|

|
This is your Convert # To Text button. I'm not quite sure what this button does. It only ever= seems to turn whatever I've highlighted into "Negative Ten". If you find out what this is used for, please let us know.
|
|

|
This is your DragonSpeak Reference button. Pressing this will bring up a dialog box that you can use to get additional information on DragonSpeak commands and how to use them.
|
File Menu: The File Menu gives you the standard options of New, Open, Save, Save As and Exit. You can also Print your DragonSpeak and save your DragonSpeak as an Optimized file. Thismeans it'll save it without all the words.
Edit Menu: The Edit Menu offers you the standard Copy, Paste and Undo options. You can also Duplicate a group of selected commands, which will let you make a copy of the code, but withchanged # values. You also have the Find, Find Next and Replace commands which are used to find/change certain parts in your .ds file. The Select All option does just that.
Code Menu: The Code Menu gives you many of the options you have elsewhere on the VisualDS.exe program. You can use Snippets here, Compress/Uncompress Blocks, Convert # To Text. You can also find out how many lines of DragonSpeak in your .ds file and listen to the sounds before you use them.
Utilities Menu: The Utilities Menu just lets you run one of the other three main Furcadia programs.
Help Menu: The Help Menu lets you run the DragonSpeak Reference dialog box and the About VisualDS dialog box.
That's it for the VisualDS program. This program offers you many tools to edit your DragonSpeak, and
hopefully this page helped clear up just how some of those tools work. DragonSpeak is a wonderful way to add magic and life to your dreams, so you'll probably be using this program a lot. If you have any further questions about it, please make sure that the information isn't found anywhere else in these guides and then feel free to contact me The Beekin Helpers.
Here's the link to a page devoted solely to giving you examples on DragonSpeak: Mason Knowledgebase.

Home to [ Beekin's Furcadia Guide ]
|
This page, subsequent pages and all content
therein, unless otherwise stated is copyright © Dragon's Eye
Productions. Site maintained by The
Beekin Scribes.
|
|