Here is the picture of the dream that we will be referring to for this Tutorial. This dream can be downloaded at the bottom of this page.
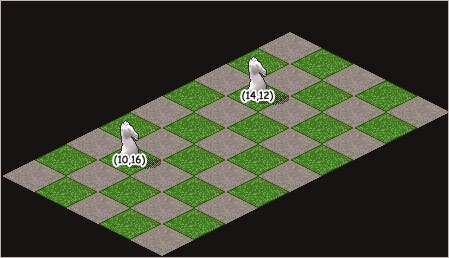

The picture above shows two objects that you probably don't use that often in your dreams. I felt like wiping the dust off of these objects and using them in this tutorial, so they wouldn't feel so left out in the world of Furcadia. Each one will be animated using a different timer system.
Before we begin the DragonSpeak part of it, let me explain how it will work. Using the two different types of timer DragonSpeak, we're going to make it so both of these objects change the direction they are facing every second. So, there will be four different objects in this animation. Okay, let's look at the DragonSpeak.
The first way that we're going to implement our animation is to use the "(0:100) When # seconds have passed, offset by #" DragonSpeak line. Let me show you the code, and then explain how it works.
(0:100) When 4 seconds have passed, offset by 0,
|
|
(3:2) at position (10,16) on the map,
|
|
(5:4) place object type 165.
|
(0:100) When 4 seconds have passed, offset by 1,
|
|
(3:2) at position (10,16) on the map,
|
|
(5:4) place object type 166.
|
(0:100) When 4 seconds have passed, offset by 2,
|
|
(3:2) at position (10,16) on the map,
|
|
(5:4) place object type 167.
|
(0:100) When 4 seconds have passed, offset by 3,
|
|
(3:2) at position (10,16) on the map,
|
|
(5:4) place object type 168.
|
Basically, we have four objects. If we want the object to completely revolve every second, it's going to take four seconds so that's the number that we put in the first part of the Cause. Because we don't want all of the animations to happen at the same time, but instead over the span of four seconds, we need to have a different offset for each of the lines. Again, if you want to know more about what the offsets mean, I suggest you read the timer tutorial.
Once we've set those, we have created the timer system that will go off every second. Now we set the location where we're going to place the object and then add the line to place it. It'll first place 165, then 166, then 167, then 168, and then it'll start over, placing 165 again, then 166, etc.
The other way of doing the same thing is to use countdown timers. This method involves more lines of DragonSpeak code, would take longer to create, and uses up countdown timers. You're only allowed to use around 100 of these, I believe (countdown timer 0 through 99).
(0:0) When everything is starting up,
|
|
(5:50) set countdown timer 1 to go off in 1 seconds.
|
(0:50) When countdown timer 1 goes off,
|
|
(3:2) at position (14,12) on the map,
|
|
(5:4) place object type 165.
|
|
(5:50) set countdown timer 2 to go off in 1 seconds.
|
(0:50) When countdown timer 2 goes off,
|
|
(3:2) at position (14,12) on the map,
|
|
(5:4) place object type 166.
|
|
(5:50) set countdown timer 3 to go off in 1 seconds.
|
(0:50) When countdown timer 3 goes off,
|
|
(3:2) at position (14,12) on the map,
|
|
(5:4) place object type 167.
|
|
(5:50) set countdown timer 4 to go off in 1 seconds.
|
(0:50) When countdown timer 1 goes off,
|
|
(3:2) at position (14,12) on the map,
|
|
(5:4) place object type 168.
|
|
(5:50) set countdown timer 1 to go off in 1 seconds.
|
Unlike the previous example, you need to start the countdown timer process in another block of DragonSpeak code. You do this by setting the first countdown timer to go off as soon as the dream is first loaded (when everything is starting up). You then set a countdown timer to go off in 1 second.
Now that you've done that, you're ready to start on the bulk of the DragonSpeak. Because you've set the first timer to go off, now you may choose the location and place the first object of the animation in your dream. Now, turn entirely to the DragonSpeak. Set a new countdown timer to go off in 1 second. Repeat this, each time setting a new countdown timer to go off in 1 second, three more times. This creates a total of four blocks of DragonSpeak code (plus another for the "(0:0) When everything is starting up," code). On the last block of code, however, instead of creating a new countdown timer, just set the first countdown timer to go off again. This will create the looping effect, so that the animation will continue over and over.
Again, the downside to this method is the fact that you use up four countdown timers to do it this way. That and the fact that it takes up more DragonSpeak lines.
Animations can be a lot of fun to put in your dream. Both of these examples were ones that looped over and over, but not all of your animations should be that way. These two examples should give you enough information to allow you to create animations of your own that either loop, or are otherwise triggered by furres. You can download a copy of this dream from the link below. If that doesn't help, you can always e-mail us at the e-mail address at the bottom of this page. Good luck!
TutorialAnimation.zip
|